Kubernetes is increasingly the application infrastructure solution of choice for modern enterprises who want to decrease their time to market for software projects, reduce infrastructure costs, and increase software quality. Because Kubernetes is so new, IT teams everywhere are learning how to operate and maintain apps running on Kubernetes in production. One common task that this blog will explore is migrating Kubernetes applications to a new cluster when additional capacity or capabilities are needed.
Below are some reasons you might want to augment your existing Kubernetes cluster:
- A bare metal cluster is becoming resource constrained and you need to migrate workloads to a new suite where there is more rack space for compute and growth.
- Services you wish to use are available in another region or cloud but to use these services, you need to move apps and your data.
- It’s time to refresh your hardware to the next generation and the specification or requirements for compute and memory capacity have changed, necessitating a migration.
- A cluster is becoming resource constrained and scaling out is becoming increasingly expensive with more instances, so you want to switch to a new cluster architecture that uses network-attached block storage instead of local disks so that you can scale storage independent of compute.
- Developers wants to be able to move workloads to a different cluster for Test or Staging that uses different hardware, network, operating systems, or other configurations.
The above list is certainly not exhaustive, but it illustrates that there are various cases where it makes sense to augment a Kubernetes environment and migrate workloads from one cluster to another. This is a fairly trivial problem when an application is stateless, but for stateful services like databases, queues, key-value stores, big data and machine learning applications, you must move data to the new, augmented environment, before your application can be spun up.
Solving the data mobility problem is the prime driver behind one of the latest features of PX-Enterprise™. PX-Motion not only includes the ability to move data across environments but also the application configuration and associated stateful resources such as PVs (Persistent Volumes) so that an operations team can easily move a volume, a Kubernetes namespace, or an entire Kubernetes cluster between environments, even when there is persistent data.
In this blog we explore the features and capabilities of PX-Motion. Specifically, we will demonstrate how to move a Kubernetes namespace and all the applications running in it to a new Kubernetes cluster with expanded capacity. In this demonstration, Cluster 1 will represent an over-utilized and inflexible configuration that no longer meets the needs of our growing set of applications. Cluster 2 will represent a more flexible and scalable cluster that we will want to move our workloads to.
In addition to moving an entire Kubernetes namespace between clusters, we will show how we can migrate an application that’s configured to use local storage in Cluster 1 to Cluster 2 which is configured to use network-attached block storage. This way, you will see that we have to move the actual data, and not rely on any tricks associated with simply managing block device mappings.
In summary, to migrate a stateful Kubernetes application to a secondary cluster, you will:
- Pair the clusters together so that you can specify a target cluster and a destination cluster
- Initiate a migration using PX-Motion, including moving data volumes and configuration
- Once data and configuration migration is complete, Kubernetes will automatically deploy the applications in the new environment.
Let’s get started!
Configuration and setup
For the demo, I will use Google Kubernetes Engine (GKE) for the Kubernetes clusters but you can do the same thing outlined below in any Kubernetes cluster. Portworx will be installed on each cluster via a DaemonSet spec from the Portworx installer online spec generator. Walking through the installation options and installing Portworx is out of scope for this blog post, but please visit the documentation for how to install Portworx on Kubernetes for more information.
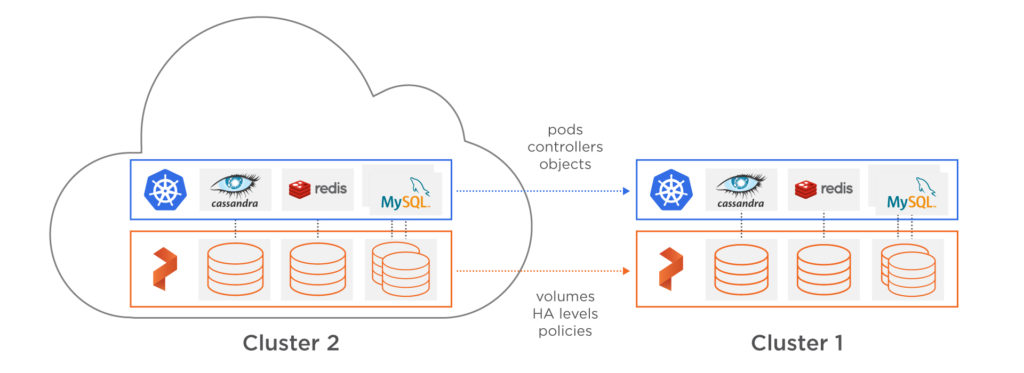
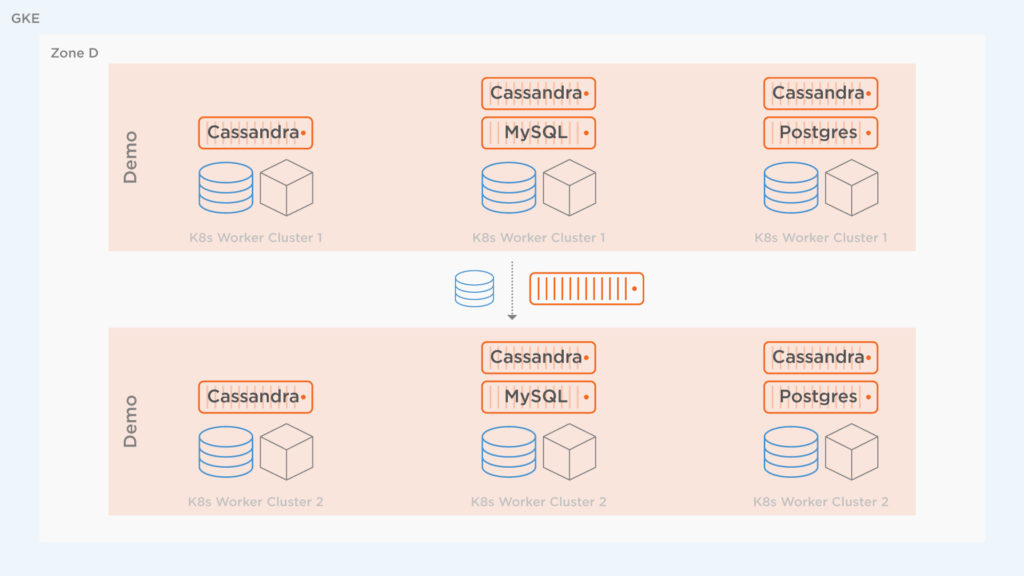
An architecture diagram of the environments is below. Note the following aspects for Cluster 1 and Cluster 2:
| Cluster Name | Machine Type | Storage Type |
| Cluster 1 (Source) | n1-standard-2 | local-ssd |
| Cluster 2 (Destination) | n1-standard-8 | provisioned PDs |
In this scenario, the first cluster (Cluster 1) is becoming resource constrained and the operations teams want to move away from using Local SSD to auto-provisioned Persistent Disk (PD) as well as a larger instance size.

Why? Local SSDs are useful for certain workloads, though they have their restrictions which is one of the reasons in this case moving applications from one namespace to another makes sense. According to Google, the restrictions for local-ssd include:
- “Because local SSDs are physically attached to the node’s host virtual machine instance, any data stored in them only exists on that node. Since the data stored on the disks is local, your application must be resilient to this data being unavailable.”
- “Data stored on local SSDs are ephemeral. A Pod that writes to a local SSD might lose access to the data stored on the disk if the Pod is rescheduled away from that node. Additionally, if the node is terminated, upgraded, or repaired the data will be erased.”
- “You cannot add local SSDs to an existing node pool.”
Portworx itself helps abstract away some of the above restrictions because Portworx replicates data to other hosts in the cluster providing HA. However, using local storage is overall still slightly limiting if we expect that we will want to add additional storage to our cluster over time, without scaling compute proportionally. The second cluster mentioned above on GKE uses a Portworx Disk Template to automatically allow Portworx to manage disks from Google Cloud, which is more flexible than local disks.
The second cluster is spun up in advance and is now using auto-provisioned PDs and is ready for migration of workloads.
Lots of apps running, need more capacity
The source cluster is shown below. It has a bunch of applications running on it in a single namespace: Cassandra, Postgres, WordPress, and MySQL. All these applications are creating high load for the cluster. Below, you can see what’s running in the cluster under the demo namespace. Remember, it is possible and common to run multiple namespaces on a single Kubernetes cluster. In this demonstration, we will move a single namespace only, leaving any other namespaces running and untouched.
$ kubectl config use-context <source-cluster>
$ kubectl get po -n demo
NAME                                 READY     STATUS    RESTARTS   AGE
cassandra-1-0                        1/1       Running   0          17m
cassandra-1-1                        1/1       Running   0          16m
cassandra-1-2                        1/1       Running   0          14m
cassandra-2-0                        1/1       Running   0          17m
cassandra-2-1                        1/1       Running   0          16m
cassandra-2-2                        1/1       Running   0          14m
mysql-1-7f58cf8c7c-srnth             1/1       Running   0          2m
mysql-2-8498757465-gqs5h             1/1       Running   0          2m
postgres-2-68c5d6b845-c4gbw          1/1       Running   0          26m
postgres-77bf94ccb5-hs7dh            1/1       Running   0          26m
wordpress-mysql-2-5fdffbdbb4-dpqm9   1/1       Running   0          17m
At a certain point, when adding more applications such as a MySQL database, the cluster hits memory limits and receives errors such as “OutOfmemory” as seen below. To solve this, we will migrate the namespace demo to the new cluster to augment the capacity of available resources to the demo namespace.
$ kubectl get po -n demo
NAME                                 READY     STATUS        RESTARTS   AGE
cassandra-1-0                        1/1       Running       0          16m
cassandra-1-1                        1/1       Running       0          14m
cassandra-1-2                        1/1       Running       0          13m
cassandra-2-0                        1/1       Running       0          16m
cassandra-2-1                        1/1       Running       0          14m
cassandra-2-2                        1/1       Running       0          13m
mysql-1-7f58cf8c7c-srnth             1/1       Running       0          1m
mysql-2-8498757465-gqs5h             1/1       Running       0          25s
mysql-3-859c5dc68f-2gcdj             0/1       OutOfmemory   0          10s
mysql-3-859c5dc68f-4wzmd             0/1       OutOfmemory   0          9s
mysql-3-859c5dc68f-57npr             0/1       OutOfmemory   0          11s
mysql-3-859c5dc68f-6t8fn             0/1       Terminating   0          16s
mysql-3-859c5dc68f-7hcf6             0/1       OutOfmemory   0          6s
mysql-3-859c5dc68f-7zbkh             0/1       OutOfmemory   0          5s
mysql-3-859c5dc68f-8s5k6             0/1       OutOfmemory   0          9s
mysql-3-859c5dc68f-d49nv             0/1       OutOfmemory   0          10s
mysql-3-859c5dc68f-dbtd7             0/1       OutOfmemory   0          15s
mysql-3-859c5dc68f-hwhxw             0/1       OutOfmemory   0          19s
mysql-3-859c5dc68f-rc8tg             0/1       OutOfmemory   0          12s
mysql-3-859c5dc68f-vnp9x             0/1       OutOfmemory   0          18s
mysql-3-859c5dc68f-xhgbx             0/1       OutOfmemory   0          12s
mysql-3-859c5dc68f-zj945             0/1       OutOfmemory   0          14s
postgres-2-68c5d6b845-c4gbw          1/1       Running       0          24m
postgres-77bf94ccb5-hs7dh            1/1       Running       0          24m
wordpress-mysql-2-5fdffbdbb4-dpqm9   1/1       Running       0          16m
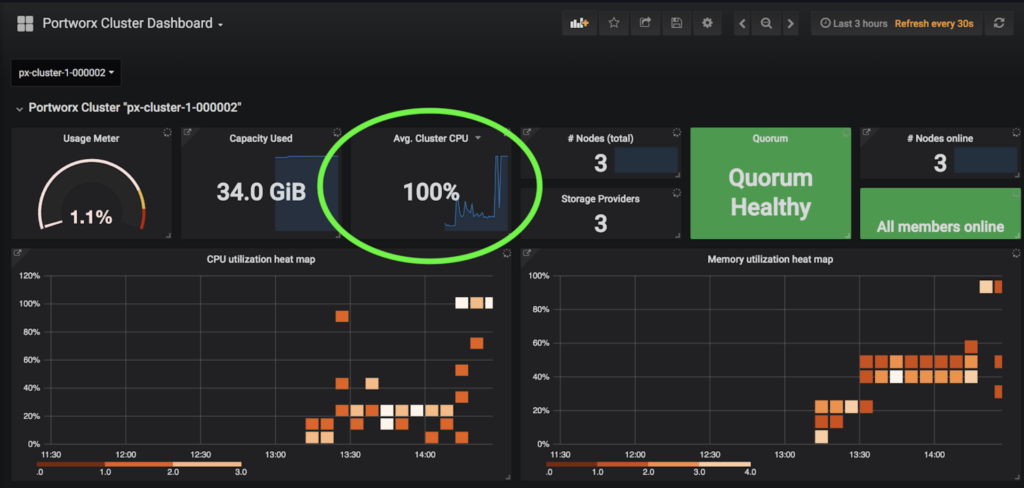
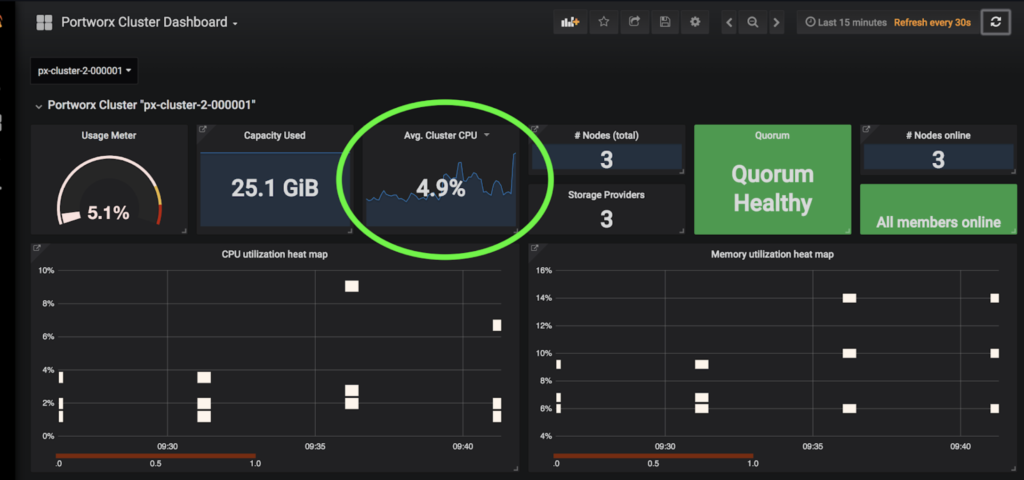
In addition to PX-Motion, the latest release of PX-Enterprise also includes PX-Central™, a single pane of glass for monitoring, metrics and management which deploys Grafana, Prometheus and Alertmanager along with Portworx itself. These dashboards monitor volumes, clusters, etcd, and more. In this case, taking a look at the cluster level dashboards will help identify issues with resources.
The screenshot of PX-Central below shows the Memory and CPU that the cluster is using. The high CPU and Memory usage for this cluster poses a problem for scaling and is likely causing the OutOfMemory errors seen above since the cluster seems overloaded.
Migrate a Kubernetes namespace, including data, with PX-Motion
Now that we’ve identified the problem, let’s perform the data migration to the new cluster using PX-Motion. First, we will walk through steps to pair both GKE clusters together and enable migrations between the source and destination cluster. Pairing our clusters is similar in concept to pairing a bluetooth speaker to a mobile phone. The pairing process lets us connect these distinct devices together.
Pre-requisites
If you are trying out PX-Migration, make sure and have all necessary prerequisites complete.
To migrate the workloads from Cluster 1 to Cluster 2, PX-Motion needs to be configured. The first thing to do is configure the destination cluster. To do this, first setup access to pxctl (“pixie-cuttle”), the Portworx CLI. Below we show how pxctl can be used from a workstation with kubectl access.
$ kubectl config use-context <destination-cluster>
$ PX_POD_DEST_CLUSTER=$(kubectl get pods --context
  <DESTINATION_CLUSTER_CONTEXT> -l name=portworx -n kube-system
  -o jsonpath='{.items[0].metadata.name}')
$ alias pxctl_dst="kubectl exec $PX_POD_DEST_CLUSTER
   --context <DESTINATION_CLUSTER_CONTEXT> \
   -n kube-system /opt/pwx/bin/pxctl"
Next, setup the destination cluster so that it is ready to pair with our source cluster. To do this, the destination cluster should first run a Portworx objectstore. We need to set up an object storage endpoint on the destination cluster because this is where our data will be staged during the migration. Then, produce a token for the source cluster to use during the pairing.
$ pxctl_dst -- volume create --size 100 objectstore
$ pxctl_dst -- objectstore create -v objectstore
$ pxctl_dst -- cluster token show
Token is <UUID>
Now, create a cluster pair YAML configuration file that will get applied to the source Kubernetes cluster. This clusterpair.yaml file will include information about how to authenticate with the destination cluster scheduler and Portworx storage. A cluster pair can be created by running the following command and editing the YAML file:
$ storkctl generate clusterpair --context <destination-cluster> > clusterpair.yaml
- Note that you can replace metadata.name with your own name.
- Note that for options.token in the below example, use the token produced from the cluster token show command above.
- Note that for options.ip in the below example, a reachable IP or DNS of a load balancer or Portworx node will be needed for access to ports 9001 and 9010.
When using GKE, before applying the cluster we need to add permissions to Stork. Stork is the OSS intelligent scheduler extension and migration tool for Kubernetes used by PX-Enterprise and will need to know how to authenticate to the new cluster in order to successfully migrate applications. First, create a service account using the Google Cloud instructions found here. Then, edit the Stork deployment and authentication to make sure it has access to the destination cluster. You can find those instructions here.
Next, apply this cluster and pair the source cluster but using kubectl.
$ kubectl config use-context <source-cluster>
$ kubectl create -f clusterpair.yaml
Once applied, check the status of the cluster pair using storkctl which should have been set up during prerequisites.
$ storkctl get clusterpair
The cluster pair is also available using kubectl and pxctl.
$ kubectl describe clusterpair new-cluster | grep paired
Normal  Ready   2m    stork  Storage successfully paired
Normal  Ready   2m    stork  Scheduler successfully paired
$ pxctl cluster pair list
CLUSTER-ID  NAME          ENDPOINT                  CREDENTIAL-ID
c604c669    px-cluster-2  http://35.185.59.99:9001  a821b2e2-788f
Initiate the Migration
Next, there are two ways to initiate a migration: via the storkctl create migration CLI, or by referencing a spec file that describes the migration. We used the second option, shown below for the migration of the demo resources and volumes.
apiVersion: stork.libopenstorage.org/v1alpha1
kind: Migration
metadata:
  name: demo-ns-migration
spec:
  clusterPair: new-cluster
  includeResources: true
  startApplications: true
  namespaces:
  - demo
Use kubectl to create the migration by referencing the above spec file.
kubectl create -f migration.yaml
Check the status of the migration. A successful migration will show the following stages: Volumes→ Application→Final
$ storkctl get migration
NAME                CLUSTERPAIR   STAGE       STATUS       VOLUMES   RESOURCES   CREATED
demo-ns-migration   new-cluster   Volumes     InProgress   2/12      0/37        08 Nov 18 15:14 EST

$ storkctl get migration
NAME                CLUSTERPAIR   STAGE       STATUS       VOLUMES   RESOURCES   CREATED
demo-ns-migration   new-cluster   Application InProgress   12/12     30/37       08 Nov 18 15:25 EST

$ storkctl get migration
NAME                CLUSTERPAIR   STAGE       STATUS       VOLUMES   RESOURCES   CREATED
demo-ns-migration   new-cluster   Final       Successful   12/12     37/37       08 Nov 18 15:27 EST
To get details about which resources such as Volumes, PVCs, Statefulsets, ReplicaSets are “InProgress” and or “Complete,” use the kubectl describe command.
$ kubectl describe migration demo-ns-migration
The status of the migration is also viewable from pxctl of the source Portworx cluster.
$ pxctl -- cloudmigrate status

CLUSTER UUID: c604c669-c935-4ca4-a0bc-550b236b2d7b

TASK-ID                                              VOLUME-ID               VOLUME-NAME                               STAGE   STATUS
6cb407e0-e38e-demo-cassandra-data-1-cassandra-1-0    673298860130267347      pvc-2c2604f4-e381-11e8-a985-42010a8e0017  Done    Complete
6cb407e0-e38e-demo-cassandra-data-1-cassandra-1-1    782119893844254444      pvc-7ef22f64-e382-11e8-a985-42010a8e0017  Done    Complete
6cb407e0-e38e-demo-cassandra-data-1-cassandra-1-2    486611245472798631      pvc-b8af3c05-e382-11e8-a985-42010a8e0017  Done    Complete
.
.
.
Now that things are migrated according to the status of the cluster migration resource, the following diagram depicts what has been performed. The namespace, applications, configuration and data from Cluster 1 have now been migrated to Cluster 2.
Next, take a look at the destination cluster to make sure the applications are actually there and are successfully running since we used the startApplications: true attribute.
$ kubectl config use-context <destination cluster>
$  kubectl get po -n demo
NAME                                 READY     STATUS    RESTARTS   AGE
cassandra-1-0                        1/1       Running   0          7m
cassandra-1-1                        1/1       Running   0          5m
cassandra-1-2                        1/1       Running   0          4m
cassandra-2-0                        1/1       Running   0          7m
cassandra-2-1                        1/1       Running   0          5m
cassandra-2-2                        1/1       Running   0          4m
mysql-1-7f58cf8c7c-gs8p4             1/1       Running   0          7m
mysql-2-8498757465-4gkr2             1/1       Running   0          7m
postgres-2-68c5d6b845-cs9zb          1/1       Running   0          7m
postgres-77bf94ccb5-njhx4            1/1       Running   0          7m
wordpress-mysql-2-5fdffbdbb4-ppgsl   1/1       Running   0          7m
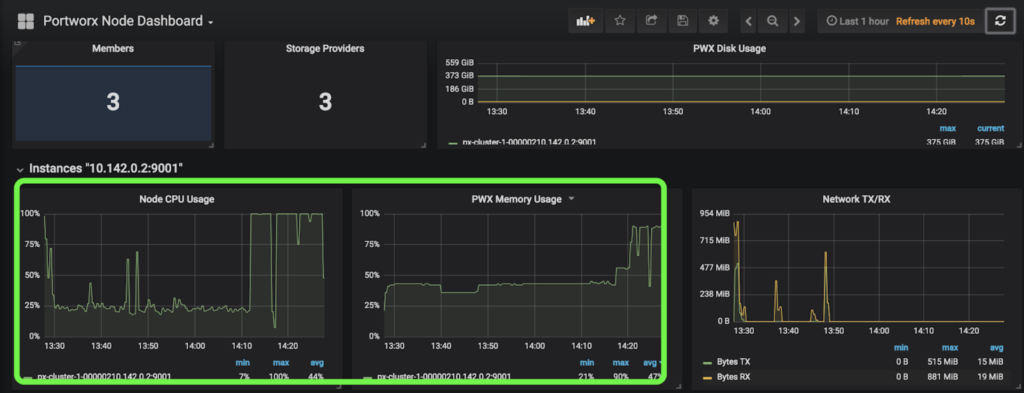
Great! All applications are running! Head back over to the PX-Central Grafana dashboards and see that the workers are using much less memory and CPU on this cluster. This screenshot shows CPU and memory for worker nodes in the cluster to which the workloads were migrated.
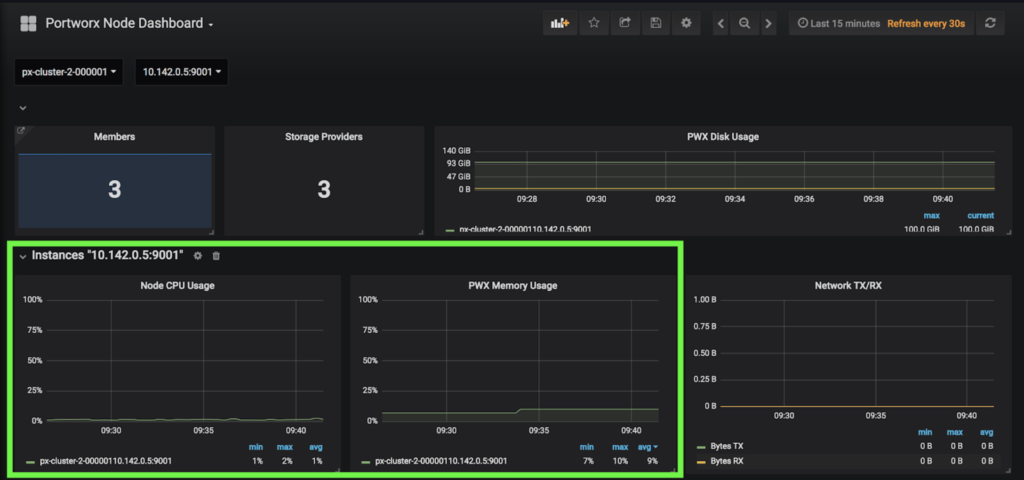
This is the exact result we were trying to achieve. Below we see the amount of CPU and Memory available between Cluster 1 and Cluster 2 on the GKE dashboard so the results above make sense.

Now that we have extra capacity, we can create the extra MySQL database we wanted. The database should have enough resources on the new cluster to launch successfully.
$ kubectl create -f specs-common/mysql-3.yaml
storageclass.storage.k8s.io "mysql-tester-class-3" created
persistentvolumeclaim "mysql-data-3" created
deployment.extensions "mysql-3" created

$ kubectl get po -n demo
NAME                                 READY     STATUS    RESTARTS   AGE
cassandra-1-0                        1/1       Running   0          22m
cassandra-1-1                        1/1       Running   0          20m
cassandra-1-2                        1/1       Running   0          18m
cassandra-2-0                        1/1       Running   0          22m
cassandra-2-1                        1/1       Running   0          20m
cassandra-2-2                        1/1       Running   0          18m
mysql-1-7f58cf8c7c-gs8p4             1/1       Running   0          22
mysql-2-8498757465-4gkr2             1/1       Running   0          22m
mysql-3-859c5dc68f-6mcc5             1/1       Running   0          12s
postgres-2-68c5d6b845-cs9zb          1/1       Running   0          22m
postgres-77bf94ccb5-njhx4            1/1       Running   0          22m
wordpress-mysql-2-5fdffbdbb4-ppgsl   1/1       Running   0          22m
Success!
The benefits of the cluster augmentation use case are immediately visible. Users or operators can delete the old namespace or applications from the source cluster or delete the whole cluster in general and reclaim those resources. The new cluster now uses auto provisioned PDs instead of Local SSD so operators can be assured that the storage as well as the compute can scale with the needs of the IT teams.
Conclusion
PX-Motion introduces the ability to migrate Portworx volumes and Kubernetes resources between clusters. The above example takes advantage of PX-Motion by enabling teams to seamlessly augment their Kubernetes environment. Migrating namespaces, volumes or entire applications between environments on Kubernetes has never been easier. Augmentation isn’t the only use case for PX-Motion, check out our other blogs in the Exploring PX-Motion series.
Video Demo
Share
Subscribe for Updates
About Us
Portworx is the leader in cloud native storage for containers.
Thanks for subscribing!

Ryan Wallner
Portworx | Technical Marketing ManagerExplore Related Content:
- data mobility
- kubernetes
- migration
- multicloud
Get Started Quickly Deploying Your Stateful Applications on Kubernetes

PX-Enterprise 1.4 Brings Application Consistent Snapshots to Kubernetes


PX-Enterprise: The first containerized storage system to support CSI on Kubernetes